Introduction
The additional drag, which arises from laminar separation bubbles, can be eliminated, by avoiding them or by reducing their size, using one of the following measures:
For the low Reynolds numbers of model aircraft, forced transition by means of a turbulator seems to be more recommendable. A small drag increase in the high speed regime is the cost which has to be paid for the bigger improvements at low flight speed. It is not a result of a bad design, when an airfoil needs a turbulator for best performance - at least not at Reynolds numbers below 1 million.
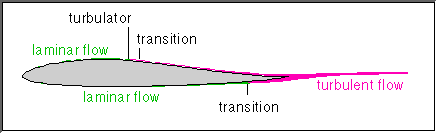
The turbulator causes transition without laminar
separation.
A mechanical turbulator consists of a modification of the airfoil shape, which causes large local gradients in the shear stress of the fluid, which finally cause transition. It can be attached to the surface as a straight tape strip (also called a 2D turbulator) or it can be distributed in a certain area like zig-zag tapes or single bumps, spaced equally. A different possibility, which has been used on free flight models, is a wire, which is mounted on small struts in front of the leading edge. This device is less sensitive to changes in angle of attack, but causes larger additional drag.
Typical values for turbulator height on model aircraft range from 0.2 for higher Reynolds numbers to more than 1 mm for free flight models (see below for an approximate method to find a suitable turbulator height). Zig-Zag tape is used on full scale gliders too, and is available from some manufacturers in different sizes.
A different method to cause transition is the so called pneumatic turbulator, which may even be controlled - either automatically or by a remote control system. Such devices are well known for years and have been used in man carrying aircraft as well as in model aircraft.
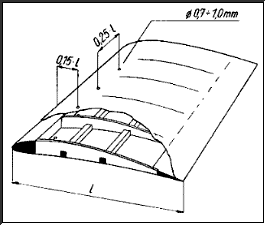
Pneumatic turbulator for free flight models, 1957, from [9].
A pneumatic turbulator consists of an array of holes in the wing surface, which are used to eject a small amount of air into the boundary layer. If the amount of air is sufficient, the resulting turbulent wedges cause transition downstream of the holes. The flow through the holes can be driven by pitot tubes or by the pressure difference between upper and lower wing surface. By a clever selection of the chord position for the holes in the lower surface, the quantity of the airflow can be controlled automatically, depending on the angle of attack. A drawback of pneumatic turbulators is their sensitivity to dust and dirt, which may fill the small holes, and the amount of work to install such a device.
The optimum turbulator should avoid laminar separation bubbles without increasing the drag. Unfortunately, on most high performance, low Reynolds number airfoils, the position of the separation bubble tends to move when the lift coefficient changes. Also the Reynolds number is depending on the lift coefficient: circling in a thermal requires high lift coefficients and low Reynolds numbers, whereas cruising at high speed leads to high Reynolds numbers at low lift coefficients. Thus a fixed turbulator will be a compromise: when it is located forward, to avoid bubbles at higher lift coefficients, it will create additional drag at lower lift coefficients, and when it is located more rearwards, it will be ineffective at higher lift coefficients.
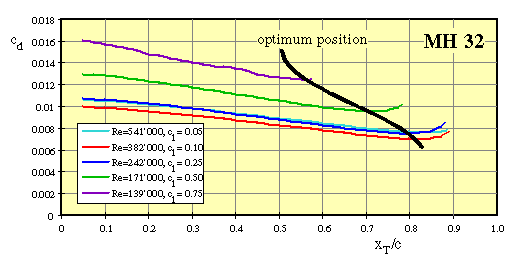
Calculated drag coefficient of the MH 32 for 5 different
lift coefficient/Reynolds number combinations. Transition has been fixed at
different x/c locations.
The figure above shows the results of a numerical experiment. For different combinations of Reynolds number and lift coefficient, corresponding to a typical F3B sailplane, the drag coefficient has been calculated. The transition has been forced to occur at different stations x/c, starting at x/c = 5%. Picking the curve for Re = 171'000, Cl = 0.5 shows, that the drag coefficient decreases steadily, while we move the turbulator rearwards, until we reach a point where the curve levels out. This is the location, where the separation bubble starts. Moving the turbulator further towards the trailing edge leads to an increase in Cd: the turbulator is simply in or even behind the bubble and has no effect anymore. A useable compromise would be to place the turbulator somewhere between 60% and 80% of the chord length, say at 70%. If you were very picky, you would have to chose different positions along the span, depending on local Reynolds number and lift coefficient - but that might generally be considered harmfully close to splitting your hair.
In general, it is possible to design airfoils so, that the separation bubble stays at the same location, but this location has to be chosen according to the low Reynolds number case (close to x/c = 50% for the above example), resulting in higher drag at higher Reynolds numbers.
Turbulators are helpful not only at very low Reynolds numbers - even on full scale sailplanes turbulators are widely used to improve their performance. The figure below shows the results of a numerical study to find the optimum turbulator position on the MH 24 pylon racing airfoil, which operates at Reynolds numbers around 1 Million.
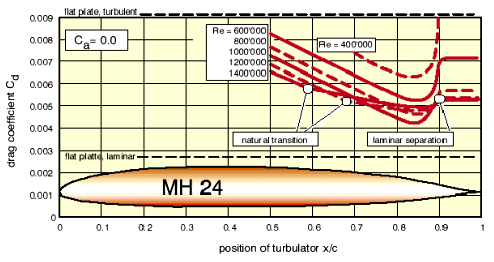
Calculated drag coefficient of the MH 24 for different
Reynolds numbers The optimum position seems to be at 84% of the chord. The drag
of the airfoil comes close to the flat plate with completely laminar flow.
A typical mechanical turbulator consists of a strip of tape, attached to the wing surface. The chordwise position of the strip is depending on the airfoil shape. Of course it must be located in front of any laminar separation. The combined polar diagrams used on the airfoil data pages also contain the transition location, which can be considered the maximum downstream position of a turbulator; to be effective, a turbulator should be located 5 to 10% of the cord before this location. The polar diagram below shows, how to find an initial location for experiments.
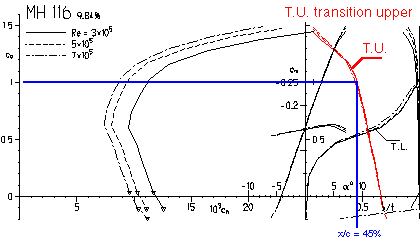
Plot of the transition location in the polar diagram.
For a selected lift coefficient of Cl = 1.0, we draw a horizontal line, which intersects the transition curve for the Reynolds number of interest. moving down we can read the location from the x/c-axis. For the example, we find a value of x/c = 0.45, where laminar separation will occur, if no transition happened in front of this location. If necessary, a turbulator should be placed at x/c = 0.4 or further upstream. There is also a curve for the lower surface (T.L.), which can be used to define a turbulator position for the lower surface, but this is usually only needed for airfoils with additional camber located close to the trailing edge, as found in some full scale sailplanes.
A mechanical turbulator must have a certain minimum height to be effective. This height depends on the position of the device, because the boundary layer thickness is growing with increasing chord position. An additional parameter is the Reynolds number, which also influences the boundary layer thickness: high Reynolds numbers result in thinner boundary layers than small Reynolds numbers (at the same airfoil chord). The thickness of the transition strip must be sufficient to cause transition, but it should not be thicker than the boundary layer to avoid additional drag.
Close to the leading edge the boundary layer is very thin (1/10s of a millimeter), when the flow reaches separation, it can grow much thicker (in the order of millimeters for model airfoils). The following diagram intends to help you by giving a first guess on the thickness of a turbulator.
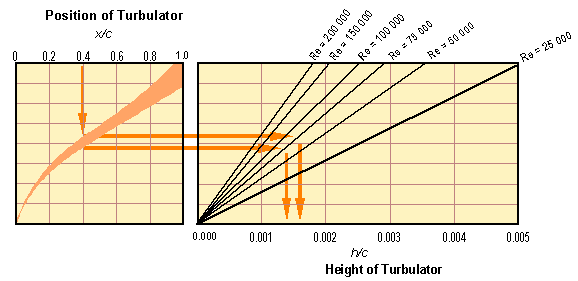
Turbulator height selection chart.
You enter the chart (after selecting an x/c position for the turbulator from the polars or the recommendations of the airfoil) at the top left axis. Dropping a line down to the orange band gives an upper and a lower intersection point, from each of which you draw a straight line to the right, intersecting the line matching the Reynolds number corresponding to the wings chord length. On the axis below, the approximate boundary layer displacement thickness can be found and used as a first guess for the turbulator height. The values found from the graph agree reasonably well with wind tunnel results [25], but further experiments will be necessary to find the optimum height (if such a thing exists at all).
| Example: | A wing has a chord Reynolds number of Re = 75'000. The chord length is 200 mm. The airfoil designer recommends transition at x/c = 0.4 by means of a turbulator. Entering the graph with these values a turbulator height of 0.0014 to 0.0016 times chord, which evaluates to a thickness of 0.28 to 0.32 mm. |
Last modification of this page: 21.05.18
![]()
[Back to Home Page] Suggestions? Corrections? Remarks? e-mail: Martin Hepperle.
Due to the increasing amount of SPAM mail, I have to change this e-Mail address regularly. You will always find the latest version in the footer of all my pages.
It might take some time until you receive an answer
and in some cases you may even receive no answer at all. I apologize for this, but
my spare time is limited. If you have not lost patience, you might want to send
me a copy of your e-mail after a month or so.
This is a privately owned, non-profit page of purely educational purpose.
Any statements may be incorrect and unsuitable for practical usage. I cannot take
any responsibility for actions you perform based on data, assumptions, calculations
etc. taken from this web page.
© 1996-2018 Martin Hepperle
You may use the data given in this document for your personal use. If you use this
document for a publication, you have to cite the source. A publication of a recompilation
of the given material is not allowed, if the resulting product is sold for more
than the production costs.
This document may accidentally refer to trade names and trademarks, which are owned by national or international companies, but which are unknown by me. Their rights are fully recognized and these companies are kindly asked to inform me if they do not wish their names to be used at all or to be used in a different way.
This document is part of a frame set and can be found by navigating from the entry point at the Web site http://www.MH-AeroTools.de/.